The Best Camera Gear for Travel Photography

As content creators and travel bloggers, one of our favorite things to do on every trip is capture photos. Throughout our time of travel, we’ve found specific camera gear we love using to create epic images. We’re also going to share useful travel photography tips to help you take beautiful pictures on your next adventure.
Disclaimer: McMillans Meet World is a participant in the Amazon Services LLC Associates Program, an affiliate advertising program designed to provide a means for sites to earn advertising fees by advertising and linking to Amazon.com.
Our travel photos didn’t always turn out great. It took a year or two of trial and error to find a shooting and editing system that worked for us. We also used to take photos with a little Sony point and shoot camera…not the best for high quality images. Also editing in Instagram….just no.
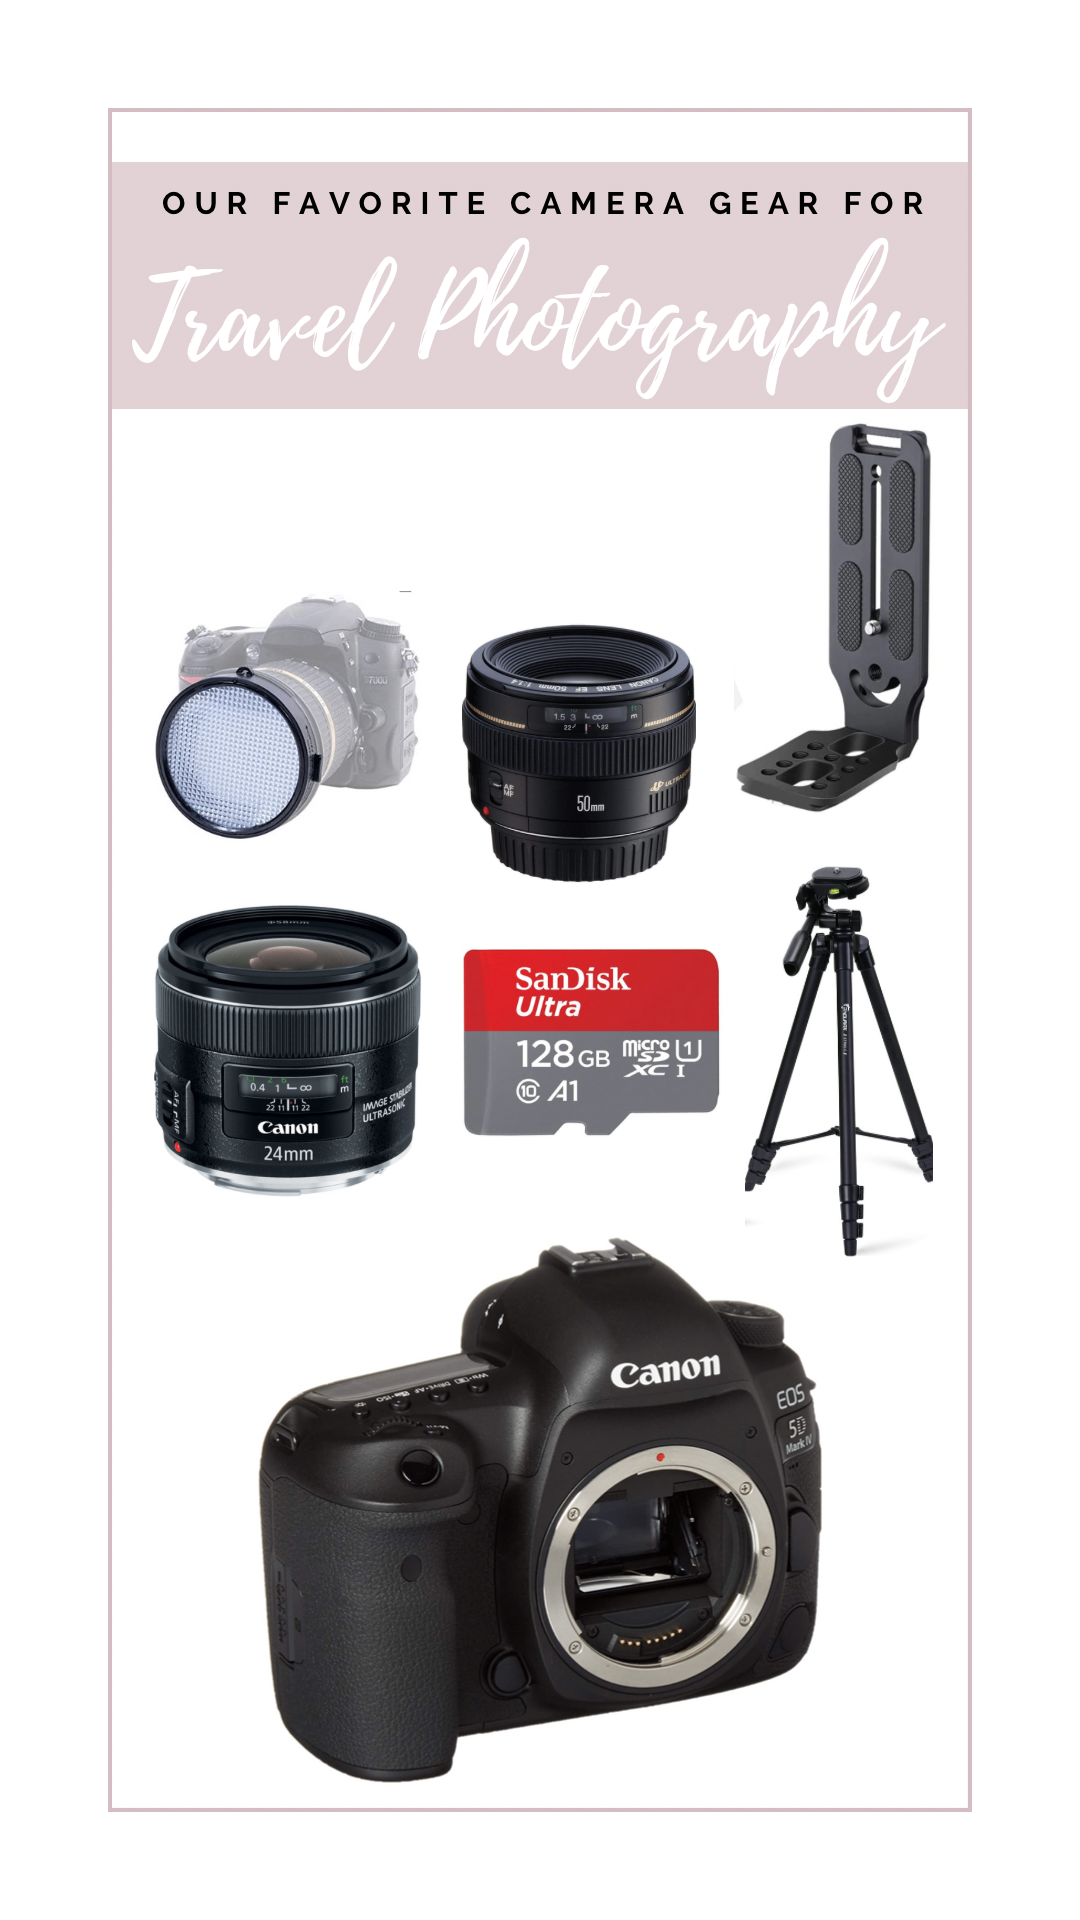
DSLR Camera
Before we get into camera settings and shooting tips, let’s talk about gear. To really take your photos to the next level, we would recommend a DSLR camera. Most DSLR cameras have manual mode which tends to be our favorite for shooting travel photography. We love our Canon 5D Mark IV. The camera body itself tends to be on the pricier side (around $2500), but we have found it to be well worth it. Full transparency, I did portrait photography for about a year to help offset the cost and to help me become more familiar with the camera and all of its settings.
Lenses
Canon EF 50mm 1.4
This lens is perfect for capturing self-portraits and has amazing focus. It is our go to lens when traveling.
Canon EF 24mm 2.8
This lens is a wide angle lens which is perfect for capturing landscape photos. We would not recommend a wide angle lens for portraits, as it tends to distort proportions.
We specifically purchased this lens before our trip to the Grand Canyon and Arches National Park, so we’d be able to capture the magnitude of both landscapes. It worked perfectly!
Canon EF 24-70mm 2.8
While we do not yet own this lens (it is $$$), it is a favorite zoom lens for a lot of photographers. We can think of so many uses for this lens from capturing close up details to photographing wildlife. Maybe some day…
Expodisc
Another favorite of ours is the Expodisc. You can nail all of your exposure settings in camera, but if your white balance is off, your photo will look off. This white balance filter is a game changer. We bought the 77mm size which is large enough to hold over our lenses; no need to purchase various sizes to snap on. Setting white balance has never been faster or easier. Consult your camera manual for directions on using an Expodisc with your model. Each brand of camera is a bit different.
Tripod
We did an entire blog post on taking better self portraits on vacation which you can read here, but we have to mention our tripod and portrait attachment again. We are more introverted people, so asking other travelers to take a picture for us has never been our thing. On the rare occasions when we did ask someone else to take our photo, it was out of focus or just not good. Needless to say, we LOVE our tripod. This tripod on Amazon is our go to for travel pictures of the two of us. It is easy to set up, has a built in level, and is sturdy enough to where I’m not worried about it blowing over with my camera attached. While the head of the tripod can pivot to take photos in portrait style vs landscape, we purchased this attachment instead. It easily hooks on to the top of the tripod, and gives me more peace of mind. We also really like this mini tripod for taking pictures or videos with our phones.
Sandisk SD Cards
Last but not least, SD cards-we have experienced the most unfortunate event of a cheap SD card failing. Over 3,000 of our pictures were lost; thankfully we had them backed up on a hard drive, but still not a happy time. Since then, we have put more thought into the SD cards we purchase. We have used Sandisk for a couple years now and have had no issues. The write speed (the speed at which your camera can record the images onto the card) is very fast as well allowing us to capture a series of images at one time. We recently went on a helicopter tour over the island of Kauai, and a fast write speed really came in handy, as we were shooting almost nonstop.
Travel Photography Tips
To maintain consistency in our travel photos, we have a shooting and editing system that we tend to use on every trip. These are tips that have worked for us, but photography is all about individual creativity, so at the end of the day, find what works for you. We always shoot in manual mode, because we like full control over exposure and focus settings. The exposure triangle is made up of three settings: ISO, aperture, and shutter speed. In short, ISO is your camera’s sensitivity to light. If your shooting environment is well lit, you’ll want to use a lower ISO; if your shooting environment is in low light, you’ll want to use a higher ISO. Aperture is how open your lens is; aperture determines how much light is let in. Shutter speed is how fast the camera’s shutter closes. There are some phenomenal YouTube videos that go more in depth on exposure settings, if you are new to manual photography.
Portraits
When we shoot self-portraits, we try to shoot an hour before sunset. This hour is often referred to as “golden hour”, as the lighting is soft and dreamy. Using the and test, we find a spot of even light. Simply place your hand in front of you in your desired location and find even light. Avoid any harsh or shadowy lighting. If we are shooting an hour before sunset, we use these settings:
ISO 400
F 2.2-2.8-allows for a good amount of bokeh or blur in the background
Shutter Speed-adjusted until the exposure meter is at 0
White Balance-set with the Expodisc
Landscapes
When we’re shooting landscapes, the time of day we shoot in varies based on our travel agenda for the day.
ISO 100-200
F 5.6-allows for a sharp detailed image
Shutter Speed-adjusted until the exposure meter is at 0
White Balance-set with the Expodisc sometimes, but more often then not, we use the built in white balance settings like daylight, cloudy, shady, etc.
Editing
We use Adobe Lightroom to edit all of our photos. Our photography style is bright and vibrant, so we normally up the exposure, contrast, vibrance, and saturation in editing. We also click the “Optics” setting and “Enable Lens Corrections” which brightens the image by removing any vignetting done by the lens. This is especially helpful when shooting with a wide angle lens. For a more in depth guide to editing, check out our post here.
Again, we are not photography experts, we just thought we would share some of the tips and tricks we’ve learned along the way. We hope you found this post to be helpful in some way!


