You’ve seen so many amazing travel photos on Instagram and Pinterest, but you just can’t seem to get your vacation photos to look quite the same. When we first started traveling, I felt the frustration of coming home with travel photos that weren’t “Insta-worthy”. Since then, I’ve spent a lot of time learning about the basics of photography, and I now understand how to take travel photos I love. In this post, I’m going to share everything you need to know about shooting in manual mode as a beginner to travel photography.
Travel Photography for Beginners: How to Shoot in Manual Mode
You probably know from the title of this post that this travel photography guide is going to focus on shooting in manual mode, meaning you will need a DSLR camera. While I love snapping quick photos with my phone, a DSLR camera takes higher quality photos that can be easily edited without changing the overall quality of the image. We’ve used a Canon 5D Mark IV for years now and love it.
The Basics of Shooting in Manual Mode
Before you begin shooting amazing travel photos, we need to cover the basics.
Know Your Camera
Before you start taking photos, it is important to know your camera. Whether you’ve recently purchased a DSLR camera or you’ve had one for years, knowing your camera model and its various settings is important. I would recommend finding a YouTube video on setting up your camera model. This will give you a better understanding of the settings in your camera’s menu. This will also allow you to create a favorites menu for quick and easy access to your most used settings (for example, the interval timer if you often shoot self-portraits).
Why Shoot in Manual Mode?
Each DSLR camera has several shooting modes, but we always prefer to shoot in manual mode. Why? Because manual mode gives us the most control over our settings therefore giving us the most control over how our images look.

4 Settings You Need to Know
When shooting in manual mode, there are 4 main settings to focus on: ISO, aperture, shutter speed, and white balance. The first three make up what is called the “exposure triangle”, meaning these settings affect the exposure of your image. Your camera has a built in exposure meter. When the three exposure settings are used together to create the perfect exposure, the meter will be set to “0” in the middle.
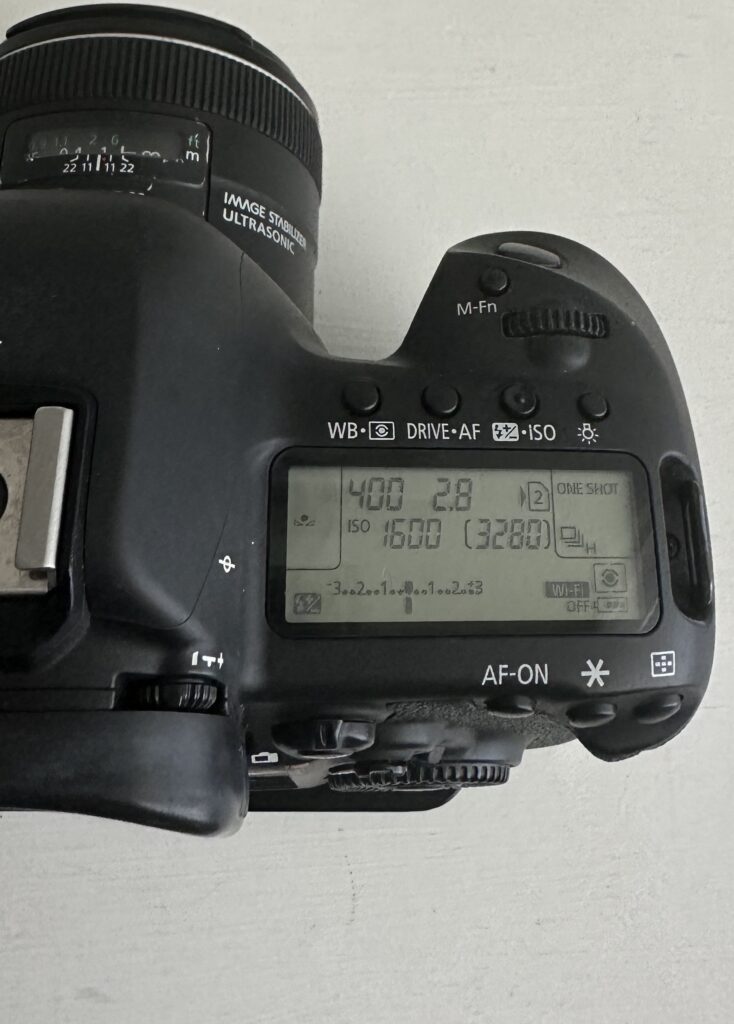
ISO is a setting that will make your photos brighter or darker. A low ISO is needed in bright environments (example: a sunny afternoon) and a high ISO is needed in darker environments (example: before sunrise or after sunset as well as indoors). A higher ISO can sometimes cause a lot of noise or grain in your image.
Aperture controls the amount of light let in to your camera. A low aperture allows a lot of light in, while a high aperture closes the hole in the lens to decrease the amount of light entering the camera. Aperture also affects the depth of field. Shallow depth of field is when the subject is in focus, but the background is blurred. This effect is achieved with a low aperture (1.2-2.8).
Shutter speed is the third and final exposure setting. Shutter speed is the amount of time the camera’s shutter is open. For example, a shutter speed of 1/25 would mean the camera’s shutter is open for 1/25th of a second. The slower the shutter speed, the more blur you will see in your image. Shutter speeds longer than 1/60th of a second will require a tripod to keep the camera still and capture an image that isn’t blurry. A fast shutter speed is used to “freeze” motion. Faster shutter speeds are often used to capture moving objects like cars, trains, raindrops, wildlife, etc.
White balance is a term that refers to how warm (yellow tones) or cool (blue tones) your image appears. In other words, white balance affects the true colors in your image. Most DSLR cameras have a variety of white balance settings.
- Auto White Balance
- Presets
- Flash
- Custom
- Kelvin
We always use custom white balance and use a tool called an Expodisc to set our white balance.
The Expodisc
One of our biggest frustrations when taking travel photos was achieving perfect white balance. We would spend so much time editing in Lightroom trying to fix the white balance of our images. We understood the exposure triangle and how to find good lighting, but if the white balance was off, nothing else really mattered. The Expodisc helps you save time editing by setting perfect white balance in camera. The Expodisc is a white balance filter that is used to set custom white balance. This tool comes in different sizes for various lenses, however you can purchase one Expodisc for your largest (mm) lens. The Expodisc does not have to attach to your lens to be effective, so one Expodisc can be used for all lens sizes. For a full guide on using an Expodisc, check out our earlier post here.
Read More: How to Use an Expodisc: A Step-by-Step Guide to Achieving Perfect White Balance
Camera Gear We Use
Here is a list of the camera gear and travel photography essentials we use.
- Canon 5D Mark IV or a DSLR
- 50mm 1.4 lens
- 24mm 2.8 lens
- 24-70mm 2.8 lens
- Tripod
- Expodisc
- Adobe Lightroom
- Sandisk SD Cards
Read More: Our Favorite Camera Gear for Travel Photography
Now that you know the basics of shooting in manual mode, it’s time to start practicing! The more you shoot in manual mode in various locations and lighting conditions, the more you’ll improve your travel photography. If you’re interested in learning more about how we take our travel photos or you want to know how we edit our photos, check out our other posts below.
[…] Read More: How to Take Amazing Travel Photos […]